Hey there, fellow cleaning enthusiasts! If you love keeping things spick and span, you’re in the right place. Today, we’re going to talk about how to maintain your printer and keep those nozzles pristine. A well-maintained printer ensures crisp and clear documents, so let’s dive into these six easy steps to clean your printer nozzles.
What You’ll Need
Before we begin, make sure you have the following items on hand:
- Isopropyl Alcohol: You’ll need this for cleaning.
- Cotton Swabs: These will help you access tight spots.
- Lint-Free Cloth: To wipe down parts without leaving residue.
- Printer Manual: Always handy for specific guidance.
Step 1: Power Down
Before we start cleaning, turn off your printer and unplug it from the power source. Safety first, folks! This step is essential to avoid any accidental mishaps while cleaning.
Step 2: Access the Nozzles
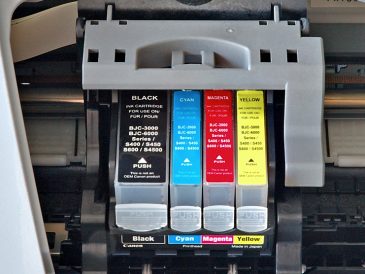
Now, it’s time to access the nozzles. The process can vary depending on your printer model, so refer to your printer manual for guidance. Generally, you’ll need to open the printer cover or access the ink cartridge area. It’s important to handle your printer with care to prevent any damage.
Step 3: Remove the Cartridges
Gently remove the ink cartridges from your printer. Be careful not to touch the nozzles directly, as this can lead to contamination. Place the cartridges on a clean, lint-free surface to avoid any debris transferring back onto them.
Step 4: Clean with Isopropyl Alcohol
Take a cotton swab, dip it in isopropyl alcohol, and carefully clean the nozzles. Make sure to avoid touching any other parts of the printer. The alcohol will help dissolve any dried ink or debris, restoring your printer’s performance.
Step 5: Wipe Down and Reassemble
Use a lint-free cloth to wipe down the areas you’ve cleaned. Then, reassemble the ink cartridges and follow the steps in reverse order to put everything back in place. This ensures your printer is ready for action after cleaning.
Step 6: Test Print
Now that you’ve cleaned the nozzles, it’s time to put your printer to the test. Print a test page to check if the quality has improved. If there are any issues, you may need to repeat the cleaning process or consult your manual for further troubleshooting. Regular test prints are a great way to monitor your printer’s performance.
There you have it, fellow cleaning enthusiasts! Six simple steps to keep your printer nozzles clean and your documents looking sharp. Regular maintenance like this will prolong the life of your printer and save you from frustrating print issues. So, keep those nozzles clean, and happy printing!
Quick Tips
Here are some quick tips to keep in mind:
- Regular Maintenance: Don’t wait until your prints are blurry. Make nozzle cleaning a regular part of your printer care routine. A monthly schedule is a good practice.
- Avoid Harsh Chemicals: Stick to isopropyl alcohol; avoid using abrasive or harsh chemicals that may damage your printer. Gentle cleaning is key to printer longevity.
- Consult Your Manual: Your printer manual is your best friend. It contains model-specific information for proper maintenance. Take the time to get familiar with your printer’s unique requirements.
- Keep a Cleaning Schedule: Set reminders to clean your printer’s nozzles every few months, depending on your usage. Consistency is key to preventing clogs.
- Consider Professional Cleaning: If you’re unsure about the process or face persistent print issues, consult a professional technician. They can provide a thorough cleaning and maintenance service when needed.
By following these steps and tips, you’ll have a printer that’s always ready to produce excellent prints. Remember, a little routine maintenance can go a long way in ensuring your printer’s longevity and performance. Happy cleaning!